I finished stitching the sepals on the pincushion rose this morning, and just as I suspected, they were more difficult than the leaves. First, they are small, and stitching tiny stitches is never an easy task, and there were quite a few more curves and stitch direction changes than even I could have predicted.
First, I organized all the colors that I would need, which looking at the sepals and how small they are, one would not think you would need all these, but every color served it's purpose. :-)

The first step of course, was to outline all the sepals with a split stitch. I must say, that all this practice is improving my split stitch technique. It isn't hard for me exactly, but trying to split stitch through one strand of embroidery floss is certainly a challenge for me. . .but all the outlining is making it easier.


Then it was time to add the shading. Each sepal had it's own distinct set of colors and order of shading. The far left and far right sepals were more difficult than the middle ones. The left one had a sharp bend, and being as small as it is, it was tedious work changing stitch directions, but I got it done, and the result was satisfactory. The right sepal has the appearance of being under the other right sepal. I followed the book directions, but thought it was missing something. I decided to let it alone at the moment, and continued with the rest of the sepals.
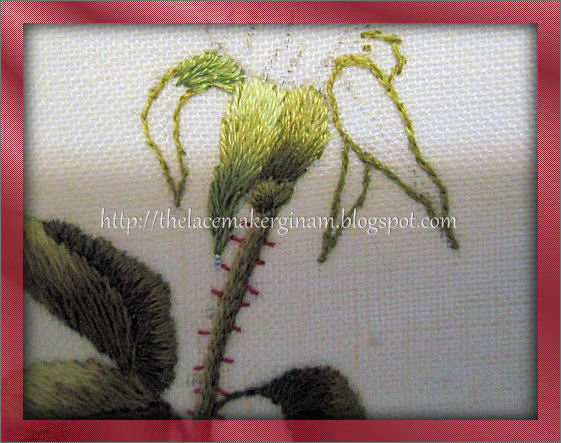

After studying the finished sepals for a moment, I decided to add some tiny shadow stitches to a couple of the sepals. Trish Burr instructs in the book to use a dark green and rose color to add some tiny straight stitches for emphasis and shadow, but I also decided that I would use the dark green to stitch some tiny long and short shadow stitches to the the two sepals on the end, and this was the finished result:


I'm quite pleased with how they turned out, and can't wait to start stitching the petals of the rose. I'm guessing, I will be done with the needle painting part of the pincushion tomorrow or Tuesday, and then I can turn this little piece of embroidered art into a sewing project.
A pincushion may not seem much like a sewing project, but to be honest, until recently, I have been somewhat afraid of the sewing machine. lol I can sew by hand, many stitches, and they come out neat and are sturdy, and until recently this has been just fine by me. Then one day, not long ago, I decided it was time to make friends with the sewing machine. After realizing all the time I can save by whipping up some zig zag stitches to prevent fraying on my many needlework projects, the sewing machine is now one of my best friends. I would like to get more comfortable with it, so I decided starting with small sewing projects at first, is a good way to start. I'm already dreaming of all the time I am going to save this Spring, when it comes time to make my daughter's Renaissance Faire costume. lol
And, last but not least, I also worked a bit on the Irish Crochet Capelet netting yesterday afternoon. I did manage to snap one photo of it, while working on it, and will take more this afternoon.

To work the netting, I'm using a combination of the old and new techniques to make Irish Crochet background netting. I have all of my motifs sewn with the right side facing the base fabric, but I like temporarily pinning the garment to a padding board when attaching the netting to the motifs. I stretch the motifs and the fabric slightly to make certain I am attaching the netting in a way that will keep the motifs lying flat. It also helps me to see where on the motif to attach the chains in order to keep the netting pattern neat and consistent. It is slow work pinning and unpinning, but I'd rather do it this way, and have a beautiful end result, than to work quickly and have mediocre, possibly, sloppy results.
Well, it's about time for an afternoon latte, and to spend time working on some Schwalm Embroidery. Remember that sampler I worked back in the Spring? Well, that one was completed not long after, and my dear MIL just fell in love with it, so I ended up giving it to her as a gift. It is now framed and proudly displayed on her wall. I really liked how it looks. So much so, that I decided to make another one, so I can frame it, and hang it on our wall . . .I'm currently working on the last band of said Schwalm Sampler. I'll take some photos of the rest of it's progress, and share them with you sometime this week.
I hope you are all having a wonderful Sunday!
'Til tomorrow,
Happy Stitches!
No comments:
Post a Comment